How to check your dog for fleas and ticks
A Step-by-Step Tick Removal Guide
Identifying Tick Infestations
Regularly checking your dog for ticks is crucial for their health. Ticks are small arachnids that can transmit diseases, and early detection is key to preventing serious health complications. Look for small, dark-colored bumps or lesions on your dog's skin, paying particular attention to areas like the ears, neck, under the belly, between the toes, and around the tail base. A thorough examination can help you identify ticks before they become embedded and transmit diseases.
It's essential to be observant and understand what a tick looks like. Ticks can vary in size, from tiny specks to ones large enough to see without difficulty. They're often dark brown or black but can also be reddish-brown. Knowing the appearance of these parasites allows you to quickly spot them on your furry friend and take the necessary preventative measures.
Preparing the Necessary Tools
Before you begin the tick removal process, gather the necessary tools to ensure a safe and effective procedure. These include tweezers with fine, pointed tips, a small container for holding the tick, rubbing alcohol, and a pair of disposable gloves to protect yourself from potential skin infections. Having these items readily available will make the process smoother and more efficient.
Using the right tools is critical for both your dog's comfort and your safety. Sharp, fine-tipped tweezers are crucial for gripping the tick firmly and preventing it from breaking off in the skin. A container for collecting the tick will help you dispose of it properly. Rubbing alcohol will help disinfect the area after removal, and gloves will protect you from any potential tick-borne diseases.
Locating the Tick
Once you've identified a tick, carefully locate its exact position on your dog's skin. Avoid disturbing the tick unnecessarily before you're ready to remove it. This helps prevent the tick from releasing any potentially harmful pathogens into your dog's bloodstream.
Thorough examination is important. Using a magnifying glass, if needed, will improve your ability to pinpoint the tick's exact location. Take your time and be meticulous to ensure you get a proper grip on the parasite. This is crucial to avoid any painful or unnecessary movements on your pet.
Using Tweezers to Remove the Tick
Grasp the tick as close to your dog's skin as possible with the tweezers. Avoid squeezing or crushing the tick's body. Gently pull the tick upward with steady, even pressure. Do not twist or jerk the tweezers, as this could cause the tick's head to break off and remain embedded in your dog's skin.
Using steady, consistent pressure is key. If you're having trouble removing the tick, consider consulting your veterinarian. A veterinarian can provide expert advice and assistance, particularly if you encounter difficulty removing the tick or if you notice any signs of infection.
Disposing of the Tick Properly
Immediately after removing the tick, place it in a sealed container, such as a plastic bag or vial. Label the container with the date and the dog's name for record-keeping. This is crucial for any potential health monitoring, and also for tracking any potential diseases if the need arises to look at the tick later.
Proper disposal prevents the spread of potential diseases. Avoid simply dropping the tick on the ground as this could endanger other animals or spread the disease. Dispose of the tick in a sealed container and store it until you can safely dispose of it.
Monitoring for Signs of Infection
After removing the tick, monitor your dog for any signs of infection or allergic reactions. Look for redness, swelling, or any unusual discharge at the site where the tick was removed. If you notice any unusual symptoms, consult your veterinarian immediately.
Post-removal care is important. Keep a watchful eye on the tick bite site for any signs of infection. Look for redness, swelling, or any unusual discharge. If you see any of these signs, contact your veterinarian right away for professional advice and treatment.
Prevention Strategies
Implementing preventative measures can help minimize the risk of tick infestations. Regular tick checks, especially during tick season, are crucial. Using topical or oral medications can also help deter ticks. Consult your veterinarian to determine the best preventative measures for your dog's specific needs.
Preventing tick bites is crucial for your dog's health. Regular tick checks, especially during peak tick seasons, are vital. Using preventative medications, such as topical or oral treatments, can significantly reduce the risk of tick infestations. Talk to your veterinarian about the most effective strategies for your dog's particular breed, lifestyle, and health conditions.
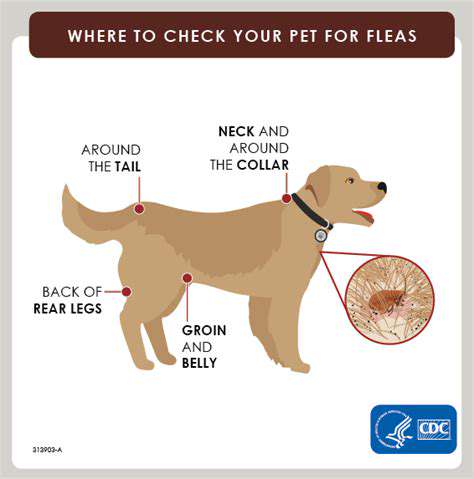
How to Inspect Your Dog for Fleas and Ticks Properly
Understanding the Importance of Regular Flea Checks
Regularly inspecting your dog for fleas is crucial for their health and well-being. Fleas can cause significant discomfort and even lead to serious health problems if left untreated. Early detection allows for prompt treatment, preventing the infestation from worsening and minimizing any potential suffering. It's a proactive approach that shows you care about your canine companion's comfort and overall health.
Fleas are tiny, blood-sucking parasites that can quickly multiply, leading to a significant infestation in a short period. Regular checks, even if you don't see any obvious signs, can help you identify and address flea problems before they become a serious issue. This proactive approach is essential for maintaining your dog's health and happiness.
Identifying the Signs of Flea Infestation
Recognizing the signs of a flea infestation is the first step towards effective treatment. Look for small, dark, reddish-brown insects on your dog's skin, particularly around the base of the tail, the neck, or the inner thighs. These are the fleas themselves, and their presence indicates an infestation.
Another key sign is itching and scratching. Your dog may incessantly scratch or bite at specific areas, often exhibiting restlessness and discomfort. This is a clear signal that something is bothering them, and fleas are a common culprit. Constant scratching can lead to skin irritation and even open wounds.
Preparing for Your Flea Inspection
Before you begin, gather the necessary tools and materials. A bright light source, such as a flashlight, will help illuminate the fur and make it easier to spot fleas. A flea comb is essential for carefully combing through your dog's fur, allowing you to identify fleas and flea dirt.
Ensure the area you are inspecting is well-lit and that you have a calm and patient demeanor. A stressed dog will not cooperate in a thorough inspection, and a frantic owner will not be able to conduct a thorough investigation. A relaxed environment is crucial for both you and your furry friend.
Using a Flea Comb Effectively
Using a flea comb effectively is crucial for detecting flea dirt and live fleas. Start by combing through the areas where fleas are most likely to be found, such as the base of the tail, the neck, and the inner thighs. Carefully comb against the direction of the hair growth. This approach allows you to thoroughly examine the skin and fur for any signs of fleas.
Pay close attention to flea dirt, which is often mistaken for dust or dandruff. Flea dirt appears as small, dark specks that will turn reddish-brown when wet. If you see this, it's a strong indication of a flea problem.
Examining Your Dog's Skin and Fur
Beyond using a flea comb, visually inspect your dog's skin and fur for any signs of flea bites. Look for small, reddish bumps or welts, especially around the areas where your dog is scratching or biting. Pay attention to the skin's overall texture. Is it irritated, inflamed, or showing any signs of inflammation. These signs can be indicators of a flea infestation.
Understanding Flea Dirt and its Significance
Flea dirt, tiny dark specks, is a crucial indicator of a flea infestation. These specks, which often appear like dust or dandruff, are actually flea feces. When examining your dog's fur, carefully check for these specks, especially in areas where your dog is scratching or biting. They are a clear sign that fleas are present and actively feeding on your canine companion.
Identifying flea dirt is often the first step in confirming a flea infestation and initiating appropriate treatment. This proactive approach is essential for maintaining your dog's health and well-being.
- Excessive Panting in Pets: A Sign of Overheating
- Case studies: Common dog health issues and solutions
- Best practices for feeding your dog while traveling
- How to prevent sibling rivalry between dogs
- Setting up a feeding routine for your new dog
- Why regular vaccinations are crucial for dogs
- How to train your dog to stop begging for food
- How to make your dog enjoy bath time
- Tips for setting up a dog friendly home
- The best collars for dogs with sensitive skin
- The best cooling vests for active dogs
- How to keep your dog calm during car rides